Märklin H0
I was born in 1978 and lived a happy childhood in the ’80s. We had only two TV channels (color TV anyway!), a Commodore C-64 microcomputer, lots of Lego Technic, and also a Märklin H0 electric scale model railroad.
My dad had purchased a large wooden board with 6 pcs of 50 cm feet; this was used as a tabletop for the railroad. I think I had two Märklin H0 extension packs, so it was possible to build a fairly long railroad with multiple sidetracks. With my three sisters, we used ordinary Lego blocks to build a town and Fabuland Lego figures as citizens.
It looked lively and was nice to play with, but I remember that I always dreamed that one day I’d build a real scenery for the railroad instead of using Lego blocks. This project started about 20 years later in 2005 when I, now a grown-up man, bought a house with my wife, and finally had enough space for a kind of man-cave.
For the first couple of years the project progressed slowly; there was lots of other things to do. When our first child was born, I moved the railroad project to the garage. It has been there since. There’s no heating, so most of the time it is just waiting for the next summer…
This page follows the (extremely slow) progress of the railroad project. It has taught me a lot about patience!
The products
I don’t have the boxes anymore, but based on the images I found from the Internet I recall these are the products that I got as Christmas and birthday presents in the ’80s:
-
Märklin H0 SET-S #2920, a kind of starter kit. Pretty sure I got this one. Search images online (new tab)
-
Märklin SET-H0 E #5190, a track extension kit with 2x manual railroad switches. Search images online (new tab)
-
Märklin SET-H0 E #5192, a track extension kit with 2x electric railroad switches. Search images online (new tab)
My building principles
Of course, I am fully aware that there are plenty of products from Märklin and others that you can buy to build a nice scale model. Also, there are hobby shops that sell all kinds of products for making the scenery. Furthermore, Youtube, web pages, and hobby clubs provide instructions and guidance.
Yet, doing it like that was never my intention. On purpose, I have not purchased ready-to-use products, looked up instructions, nor participated in clubs. Instead, I have used all kinds of scrap material from my storage, things that I’ve got from friends for free, and mostly invented my own ways of doing things. This has been the principal idea of the whole project.


When building a scale model, many people aim for 100% realism: the scale, the looks, the ground surface, the trees, the water, etc. should all be a perfect down-scaled copy of some real location.
I did not have any specific location in mind. Instead, I had many ideas: there should be two mountains, two tunnels, a bridge, a lake, and a village with a railway station. That’s quite a lot for a scale model of this size! As a consequence, I had to make compromises. For example, a real train track would not have as steep inclines and declines that I needed to use.
Furthermore, instead of modeling a specific real-world location, I chose to use an imaginary place. I just decided to make some kind of Wild West-themed scene: a small town somewhere in Arizona, US. I even considered whether to use the famous comic book hero Lucky Luke, but gave up on that idea.
The scale
Just like the name implies, scale models are models of things but in a different size. In my project, the defining factor for the scale comes from the Märklin train. H0, which is the term that Märklin uses for this size, is 1:87 scale.
This concept is familiar to everyone from maps. For example, a map might be drawn in the scale 1:10000, which means that 1 cm on the map is 10 000 cm (or 100 m) in the real world.
Hence, the H0 scale or 1:87 simply means that 1 cm in the scale model corresponds to 87 cm in the real world. If we use a calculator, the relation 1:87 is approximately 0.0115. Thus, another way to think about this is that the scale model is just 1.15 % of the real-world size. 1 meter (100 cm) in the real world becomes 1.15 cm in the scale mode. A man of my height i.e. 175 cm tall would be just 2 cm in the scale model. You get the idea.
When you think about it, this scale is pretty small. If a man’s wrist is 5 cm wide, in the scale model that would be about 0.6 mm. Details that appear in the sub-millimeter resolution are really difficult to manufacture at home. You have to make compromises - either leave out some details, only paint them instead of building them, or cheat with the scale.
I have decided to relax a bit with the scale. For example, wooden sticks for hobby use are available only in a few sizes. If I use them to build a bridge, they probably do not match with the 1:87 scale. But who cares, if the bridge looks good and is made of real wood instead of plastic? There’s some value in that, too.
On the other hand, it is useful to know the scale and apply it whenever it works in practice. For example, if I 3D print an object, it is fairly easy to adjust the scale - up to the limits of the printer, of course.
The baseboard
I needed some kind of a large baseboard for the whole project. For building that, I used pieces of an old wardrobe. There are just three walls and a top, as well as some enforcement below the top board to make it sturdy. One side is open, so I can crawl under it to make holes, connect electrical wires, etc.

In the beginning of the project I wanted to have the possibility to move the whole thing in pieces, so I cut another thinner board in 6 pieces, put these pieces on top of the baseboard as a 3x2 grid, and added small brackets to the sides of the baseboard for keeping the thinner boards in place (you can see the brackets in the image).
Elevation!
Next, I designed how the track pieces would be laid out and drew sketches to the thin boards. It was important to check that I could put the track pieces together the way I wanted.
Then, I started to add elevation by cutting pieces of hard styrofoam. I used a tool that looks like a soldering iron, but has a different blade and doesn’t get too hot. The smell was awful, even with windows and doors open I could work only a short period at a time.

For attaching the layers of styrofoam, I used toothpicks and glue. Very simple, but worked well.

Some layers I didn’t glue together at this phase. It was necessary to be able to open the tunnels later for making their interior walls, etc. However, the lowest layers I did glue to the thin boards. As a result, I had 6 parts that could be placed on the baseboard but also removed whenever necessary.

After cutting the styrofoam parts, I built the railroad and tested it to make sure that the parts fit the planned route, and also that the elevation is not too steep for the locomotive - it has to be able to pull at least two cars uphill. (By the way, the tool I used for cutting the styrofoam is on the right).

The pulp
The surface of the cut styrofoam pieces looked rough. I wanted to make it smoother and be able to refine the forms of the landscape. For this purpose, I tore some newspapers into pieces and added water and wallpaper glue. Then I mixed it using a power drill and got a kind of paper pulp. It was really wet, so I filtered it.

Then, I started to apply the pulp as a thin layer on top of the styrofoam pieces.


It took quite some time until the pulp dried. I used a fan to speed it up.

Once it began to dry, the color of the surface started to turn from light gray to white.

Again, I built the track and tested that everything still worked as expected.

Smoothing the surface
Next, I wanted to make the railroad tracks look more realistic. My Märklin tracks are of the type that includes “a bank of gravel” below the steel tracks. That’s not the best option for a scale model like this, but what can you do - I wanted to use the pieces I already had.
I decided to use real sand for masking that fake gravel bank. For attaching it to the surface, I used a material that is typically applied to dry-walls for covering their seams (I had a big bucket of that after a renovation project at the house). I also used the same material for adding yet another layer to the whole landscape, on top of the dry paper pulp. This made it even smoother (and light gray again).

I used more coarse grain gravel for masking some parts of the railroad track banks. I also tested black spray paint to get an idea of how it would look like after painting.

The surface is already looking pretty good to me. But now it desperately needs painting!

Painting the surface
I bought a cheap airbrush, solvent, and some Revell paints. Already had a big (and noisy!) compressor in the garage. Of course, it was necessary to open the doors and use a good-quality respirator mask while painting, as I used enamel paints.
The work was slow and the airbrush was not that easy to handle. Oftentimes, it got stuck after 30-60 minutes of work and I had to stop. Somehow, I still liked a lot doing this part. Probably because the scale model started to resemble something real.

As a kid I used to build Revell airplane scale models, and still had a set of old Revell paints. Surprisingly, some of them were usable after 25 years! Of course, I had to buy more to get fresh paint and colors that are suitable for this model.

After painting, the gravel banks started to look pretty good.


Since it was so terribly slow to paint large areas with the airbrush, I used spray paint cans for painting some larger areas with black and giving a base color for the red Arizona mountains.


The lake and the bridge
I painted the lake with blue color and built a wooden bridge from a bag of hobby sticks. It kind of resembles the bridge of the river Kwai, if you know the movie.

A friend had given me a half-empty bottle of “scale model realistic water”; some kind of resin that should look like water when it dries. I used that for making the lake look more realistic. Unfortunately, there wasn’t quite enough of it left. I may have to purchase a bottle of this to finish the lake later.


I really like how the bridge turned out. It has a nice, old-time look and feel.


Later, I added some more woodwork to the sides:

The railway station’s platforms
For the railway station, I had created a sidetrack. Now I wanted to cover the platforms with wood and again used hobby sticks.
I glued the sticks side-by-side to a piece of thin cardboard, then glued to the whole thing in place, and used a Dremel for cutting the ends. Looks like a real construction site.

This is how it appears after painting. I used a couple of shades of brown and gray colors to give it a more worn-out look.


The tunnels
A tunnel is a must-have, and I wanted two of them. The track goes throw one tunnel and the other one is more like a gold mine or something.
I painted the interior walls of the tunnel black, as a steam-engine locomotive would probably have smoked everything inside a tunnel. With a little bit of light shining from the end, the still wet walls look really good. A bit scary, too. You wouldn’t want to go there alone, ha? I can almost hear an echo bouncing off from those walls.

I also added a few large RGB LEDs (notice the bulb in the roof of the tunnel just above the locomotive). This way I can tune the lighting later.

The other tunnel. Or a gold mine. Not sure about that yet.

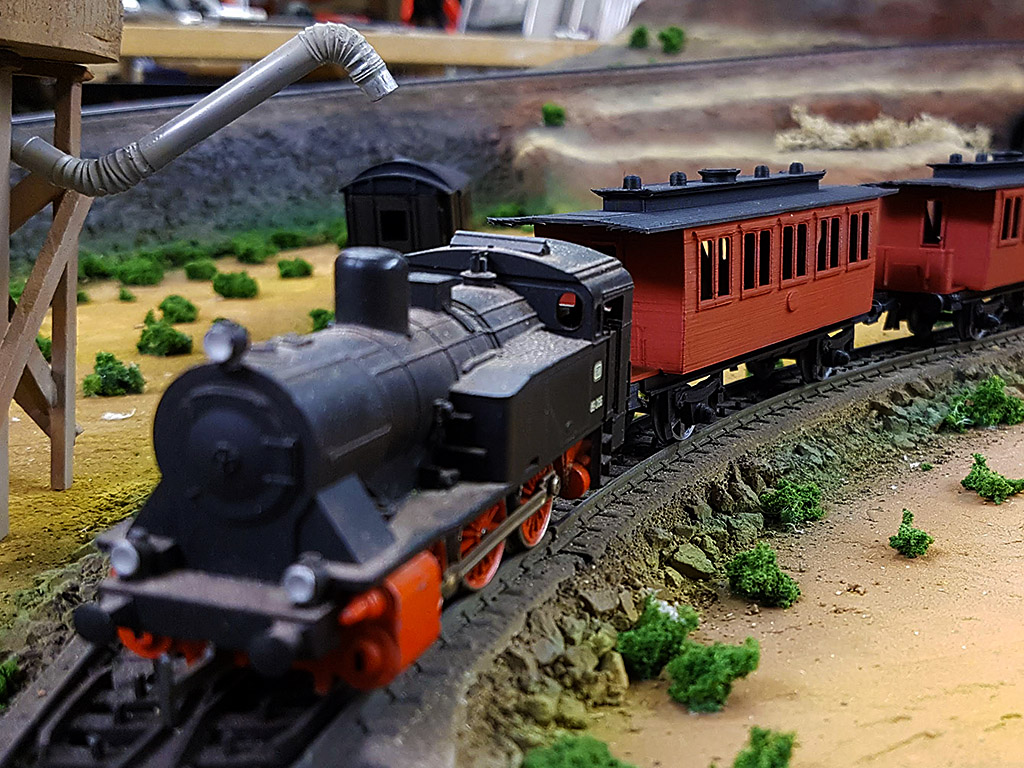
The water tower
Old-time steam engine locomotives need water. After all, that’s the raw material for making steam by burning coal. So, there has to be a water tower for filling up the locomotive’s water tank.
I made this one from hobby sticks and a couple of pieces of soda straws.

Here’s a short video clip of the train passing the water tower:
More painting work
Now it was time to paint some details. I had previously painted the whole scale model with base colors. Adding a little bit of green, gray, black etc. to mimic vegetation, emphasize shadows, etc. makes the model much more lively.
Here I have added a little bit of green and yellow to the gravel banks.


Also green and yellow to the lakeside:

Some gray and black to the mountains:

Also some yellow and light brown to make the erosion of the mountains visible and to tone down the red base color, which was too bright:


Also added a waterfall to the mountain:

All in all, the colors are starting to look good now. However, it looks rather empty there! It is time to add vegetation - bushes and trees etc.

Vegetation
A friend gave me some scale model “bushes”, a material that can be used for making trees etc. I added that here and there near the gravel banks.


I also got some scale model grass, a light green powder. I added that with bushes near the lake. Also let some grapevine branches dry up and made a few dead trees from that.
By the way, in the image you can see a little side project: I added more woodwork to the bridge.

Here we have some self-made trees and bushes, made by painting dried lichen (“poronjäkälä” in Finnish).


Now the vegetation is beginning to look ready. Although, the contrast between the sandy scene and very bright green grass and bushes is a bit disturbing. I may have to tone it done by adding a little bit of dust with a light brown color.


3D printed train cars
In 2018, I purchased my first 3D printer. It is such a versatile tool, helps a lot also in my railroad project. I’ve found online many 3D designs for the H0 scale, modified some as needed, then printed and painted the parts at home.
For example, this railroad cargo car was printed in parts, which I then glued together. The pencil is for size comparison. The level of detail is pretty good.


I’ve also made some props, such as barrels and canoes. Here they are in an open cargo car. The car’s chassis is 3D printed, too. The only thing that I cannot print is the axels for the wheels and screws for attaching the connecting mechanism. As always, painting the parts makes a big difference.


The downside of the 3D printed cars is that they are not suitable for driving with the locomotive. The plastic wheels are too loose and the whole car is so light that it derails all too easily. I’ve made them just to have some extra cars resting on the side tracks.


3D printed props
Wooden barrels were a common thing in the past. I’ve made lots of these and added here and there.

At the end of the track, there must be a buffer:

Some canoes at the lakeside:

Current status
This is how the scale model looks at the moment, from above:


Here’s a little comparison between the scale model and a real locomotive at the train station of Oulu, just for fun:


Next steps:
- Buildings: Design, 3D print, and paint some buildings. A railway station, a saloon, a bank, some workshops, farm buildings. Plus some extra props, such as carriages, wheels, etc.
- Animalia: Design, 3D print, and paint various animals and people. Sheep, goats, maybe an eagle or two.
- Fixes: Add more “realistic water” to the lake. Finish the painting jobs.
- Driving: Add a shelf for the control board and connect all the electronics.
- Background: Attach background boards to the sides and the back. Paint there a sunset or other distant scene.
- Point-of-view: Make a special car or other solution for putting a small camera on the train.
- Shoot a set of final images and videos. The project is completed.